

Checking Out
Working with Existing Branches/Changing Between Branches
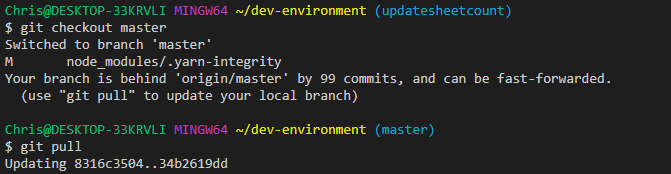
Remember, we never make changes directly to the Master branch, but we create branches off Master to do our work. We can swap between Master and feature branches by usinggit checkout {branchName}.
Examples:
git checkout master- Move to the Master branchgit checkout retainingWallsUSA- Move to the retaining walls branch
git pull before and after you swap to ensure you have the latest copy of everything on your local PC.
Command line workflow:
Creating a New Branch
If you are not looking at someone else’s work or swapping into a branch you’ve already been working on, you will need to create a new branch. To ensure this, and to avoid headaches later because you were working off old data:- Checkout master:
git checkout master - Pull master:
git pull - Create your new branch
-b to our checkout command to tell Git it’s new:
Making Changes and Submitting Your Work
Staging & Committing
Once you have successfully checked out a new or existing branch, you’ll be ready to start making changes. Provided your VScode and Git have been set up correctly, as you make changes, they will appear in the sidebar under ‘Changes’.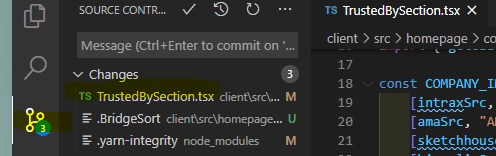
Understanding Commits
Github thinks of version control in terms of Commits - these are bundles of changes, with a reason behind them. Each branch can have multiple commits, all it means is we are grouping (Staging) each set of changes we make, and naming them.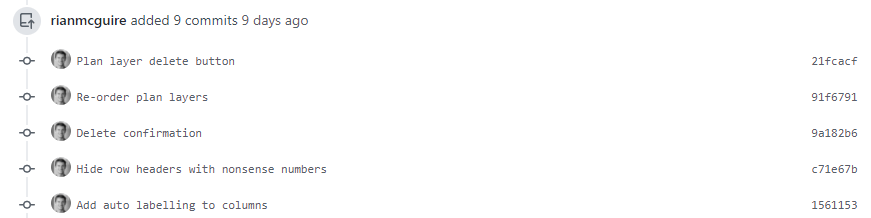
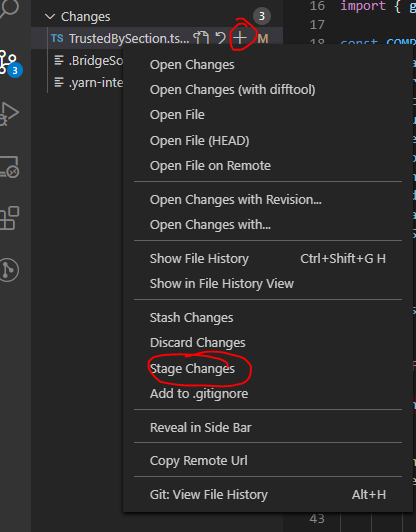
How to Stage Changes
To stage some changes, you can either:- Click the + icon next to the file you want to stage
- Right click the file and click ‘Stage Changes’
How to Commit
As you stage your changes, they will move into a ‘Staged Changes’ dropdown, meaning they are ready to be Committed. To commit:- Enter a message in the dialog box above describing your changes (e.g.,
Amended calc count in trusted by section) - Click Ctrl + Enter (or Cmd + Enter on Mac) to submit and commit your changes
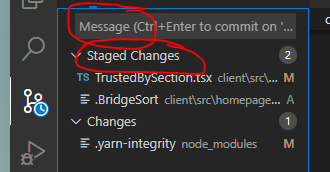
You can also right click and Unstage changes if you make a mistake, or click ‘Discard Changes’ if you want to irreversibly delete the new changes you’ve made and go back to the version you most recently committed.
Pushing to Github
If you are working on a new branch that has never been pushed before, you will get a fatal error (this is fine). Just copy and paste the message into the terminal and it will push properly.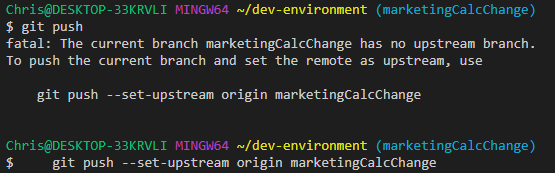
- Keep working and create new changes and commits
- Change to another branch without fear of issues
Submitting Your Work Back to Master (Pull Requests)
When you’re ready to submit your work back to master, you need to create a pull request. We will cover that in volume two of our git for dummies series when chris isn’t tired and thirsty.Common Issues
Coming Soon
Coming Soon
- Merge conflict
- Git reset/bad commit
- Can’t find branch (git fetch)
- Bad line endings (bad git for windows setup)
- Branching off a branch
Git command reference
Basics for Calcs.com
We use git to manage all of our development work for Calcs.com. You should reference any of the dozens of git tutorials Google will find you about git if you’re completely unfamiliar (like this from git-scm). However, these are going to be the common tasks you’ll want to do with git on your computer. All of these commands should either be run from VSCode itself, or from the dev-environment directory in a local terminal on your computer.Common Tasks
Checkout an Existing Branch
You will always be on a “branch” - which is a current set of code for Calcs.com. Each branch is either a new segment of work or ‘master’, which is the code behind what’s currently in review (on preprod.calcs.com).- VSCode
- GitHub Desktop
- Terminal
- Go to the git view (left sidebar, third icon down, Y-shaped)
- Under “Source Control Providers”, you’ll see “dev-environment” and the current branch
- Click on that branch name and select a new branch to change it
- Click the circular arrow to the right of the branch name to get the latest work
Create a New Branch
Any time you start on a task which will make a complete work product, such as a single new sheet, or one major change to an existing sheet, you’ll create a new branch.- VSCode
- GitHub Desktop
- Terminal
- In the git view, click on the current branch name
- Change to ‘master’, then press the circular arrow (VITAL - ensures you’re starting from the most recent code)
- Click on the branch name again
- At the top of the list, click “Create a new branch”
- Type in the name of your new branch, press ‘Enter’
- Click the cloud button to the right of the branch name to create the branch on the server
Commit a Change
After you change a few things and save your file, you should ‘commit’ your changes.- VSCode
- GitHub Desktop
- Terminal
- In the git view, click the ”+” sign on each file you want to commit to stage your changes
- Write a description of your commit in the “Message” line at the top
- Click the checkmark next to the branch name, or press Alt+Enter (⌘+Enter on Mac)
Nothing gets sent to the server when you commit. You need to push your changes!
Push Your Changes to the Server
Actually send your work to the server. This becomes both a backup and helps keep track of everything.- VSCode
- GitHub Desktop
- Terminal
Click the circular arrow icon to the right of the branch name under “Source Control Providers”. This will ‘push’ all your commits to the server and ‘pull’ anyone else’s updates.
Create a Pull Request (PR)
When you think you’re done with all of the work in your current branch, you should create a pull request to get your changes pulled into the master branch. On github.com only:- Log in to github.com
- Click on “Pull requests” (or use this direct link)
- Click “New Pull Request” and select your branch
- Assign someone else as a “Reviewer” (on the right-hand panel)
- Click submit!