This article is for experienced StruCalc users learning how to use Calcs.com. It explains key similarities and differences between StruCalc and Calcs.com for each calculation. Click a link below to jump to the calculation or feature that you’d like to compare.
For entirely new users, we recommend using this article as a reference while following along with our 3 step getting started guide that walks through how to create and export your first calculation. If you have any questions getting started, please don’t hesitate to contact support.Table of Contents
Calculations
- Concrete Footings
- Beams (Beams, Joists etc.)
- Rafters
- Hip/Valley Beam
- Column
- Collar Tie
- Shear Wall
- Additional/New Calculations in Calcs.com (Wind, Custom Sections, Concrete and more!)
Features
- Adding and Managing New Calculations and Projects
- Load Tracking
- Printing
- AutoSize
- Adjusting Member Codes
- Adjusting Deflection Limits and Defaults
- Materials Editor
- Extra Features in Calcs.com (Unit awareness! Formulas!)
Calculations
StruCalc users will feel right at home with Calcs.com’s expansive range of calculations. Help is baked into the platform, so if you’re ever unsure what something means, just click the field label to immediately drill down and see the description, formula, and references.Concrete Footings
Watch a short tutorial on how to design a spread footing in Calcs.com. StruCalc has easy design modules for square, continuous, round, and rectangular footings. Calcs.com also has calculations for square/rectangular (Spread Footing) and continuous footings (Strip Footing), and round (pier) footings. ClearCalc’s footing calculator is essentially the same as in Strucalc, but we also have these additional features:- Eccentric loads (including biaxial cases!)
- You can specify X and Y axis bottom reinforcement bars separately
- You can choose to toggle top reinforcement on as well
- Rebar development length check
Beams (Beams, Joists, and Rafters etc.)
Watch video examples of joists, rafters, and ridge beams here. Calcs.com takes a slightly different approach to StruCalc when it comes to designing joists, rafters, and floor beams. Instead of having separate calculators, our beam calculator is flexible enough to allow the design of each - by choosing a ’ preset’ when you create the beam, common inputs will be defaulted for you (for example, the floor joist beam preset will default to a repeating member). Read on below for some specific differences, as well as design examples. Choosing Beams StruCalc: Joists and rafters have separate buttons Calcs.com: You choose a beam type first (ex. Wood Beam) and then the beam sub-type (ex. Floor Joist) Beam Geometry and Supports StruCalc: Specify the length of the left, center, and right span, and tick if there is a cantilever Calcs.com: Simply specify total beam length (sum of all spans) and place as many supports as you would like along the beam (ex. for a 5ft beam with a 1ft cantilever on the right, you would specify Length = 5ft, Support 1 = 0ft, and Support 2 = 4ft) - this will graphically show on the diagram so it’s easy to tell what you’ve done. Learn more about support types here.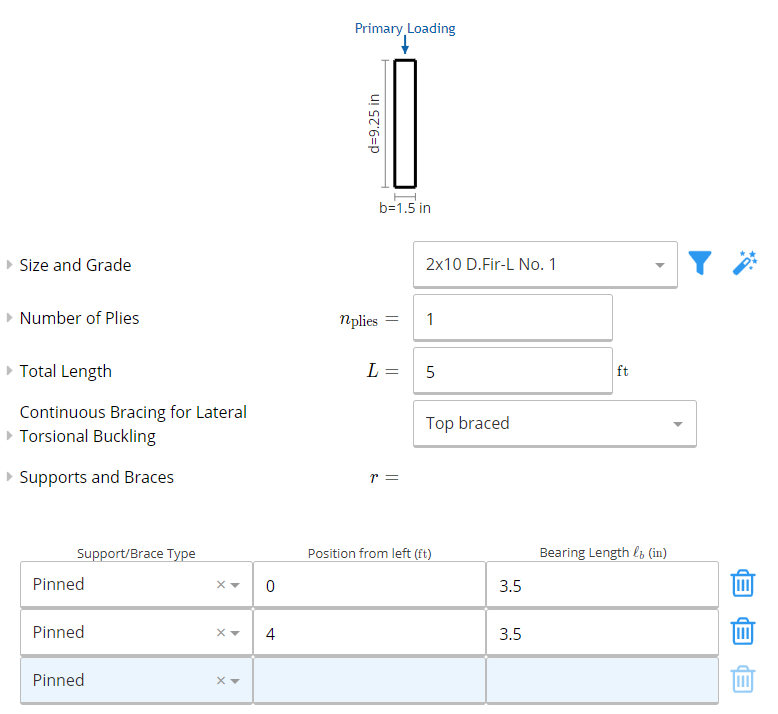 Beam Loading
StruCalc: You need to decide between uniformly loaded and multi-span beams
Calcs.com: All Calcs.com beam calculations support unlimited supports and loads.
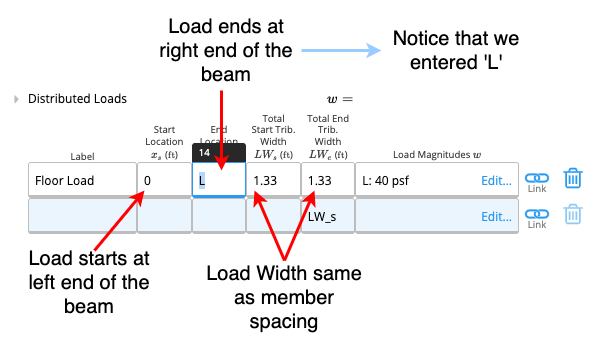
StruCalc: Loads are given as ‘side one’ and ‘side two’ with a tributary width
Calcs.com: You can manually enter and label the loads how you would like. If you would like to copy how StruCalc does it, you can simply create a row for each side, label them Side 1 and Side 2, and give it the tributary width you desire.
See our article for how to enter distributed loads which includes screenshots and worked examples, including how to calculate tributary width.
Beam Loading
StruCalc: You need to decide between uniformly loaded and multi-span beams
Calcs.com: All Calcs.com beam calculations support unlimited supports and loads.
StruCalc: Loads are given as ‘side one’ and ‘side two’ with a tributary width
Calcs.com: You can manually enter and label the loads how you would like. If you would like to copy how StruCalc does it, you can simply create a row for each side, label them Side 1 and Side 2, and give it the tributary width you desire.
See our article for how to enter distributed loads which includes screenshots and worked examples, including how to calculate tributary width.
 StruCalc: Wall load is only available in Plf, not Psf
Calcs.com: Wall load can be entered as plf loads by using the ‘Line Loads’ table below Distributed Loads. You can also enter a wall load into the Distributed Loads table alongside your floor and roof loads. This can be a great time saving trick as you can set the tributary width to the height of the wall (for example, 2ft) and the load magnitude to the weight of the wall in Psf.
StruCalc: Wall load is only available in Plf, not Psf
Calcs.com: Wall load can be entered as plf loads by using the ‘Line Loads’ table below Distributed Loads. You can also enter a wall load into the Distributed Loads table alongside your floor and roof loads. This can be a great time saving trick as you can set the tributary width to the height of the wall (for example, 2ft) and the load magnitude to the weight of the wall in Psf.
Rafters
Calcs.com allows you to design rafters using our beam calculators (see above section on beams). You can still enter a roof pitch and set interior and eave length, just as you would in StruCalc, only you do it in the Wood or Steel beam calculator by choosing the ‘Rafter’ preset.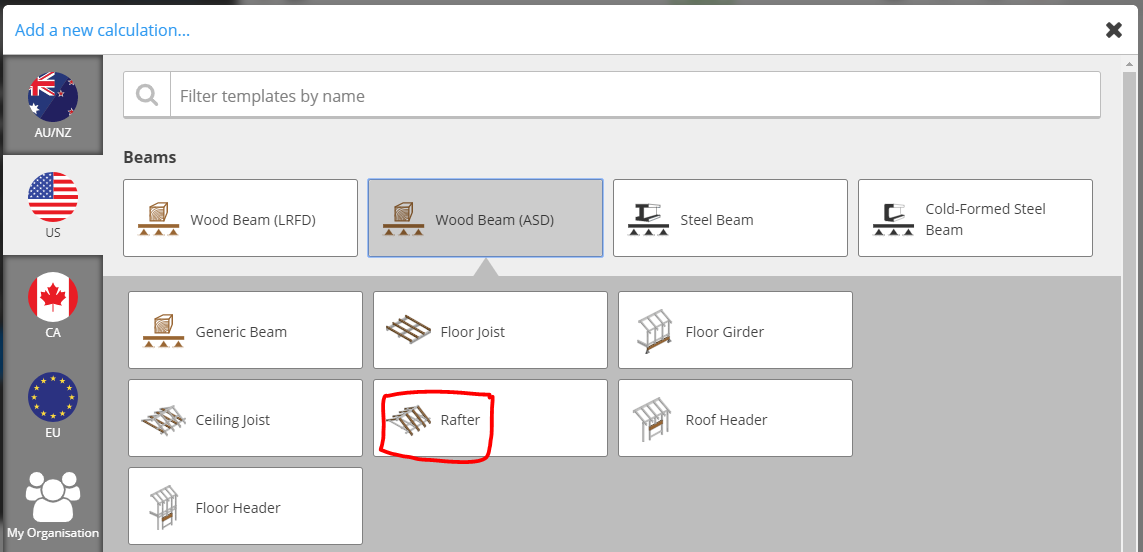
Rafter Design Example
Length and Supports StruCalc: Enter interior length and eave length, plus roof pitch Calcs.com: Enter total rafter length, and as many supports as you would like, as well as roof pitch (for example, for a 7.5ft interior span, and a 1.5ft eave length, you would specify a total rafter length of 9ft with supports at 0ft and 7.5ft, creating a 1.5ft cantilever on the right) Tributary Width: StruCalc: Is based on O.C rafter spacing Calcs.com: Same, but to save time, if you select the Rafter preset, tributary width will default to the O.C Rafter spacing you specified in the Project Details panel when you created the project, but this can be overridden for each calculation if your rafters have different spacing. The O.C. spacing will be specified in the ‘Tributary Width’ field in ft. So if you specify 16in for example, this will be converted to 1.33 ft. Loads: StruCalc: Enter Roof live load and dead load, and toggle snow on or off Calcs.com: Same, except you have greater control over snow loading and can add additional partial or point loads for things like solar panels. If you’d like to double the live load on the eave, just add a partially distributed load across that section of the rafter. Bracing StruCalc: Defaults to top bracing and you can tick toggle to add ‘Bracing Applied to Bottom of Rafters’ Calcs.com: Also defaults to top bracing, but has even more bracing options! N.B. The equivalent to ticking ‘Bracing Applied to Bottom of Rafters’ in Calcs.com would be ‘Top & Bottom Braced’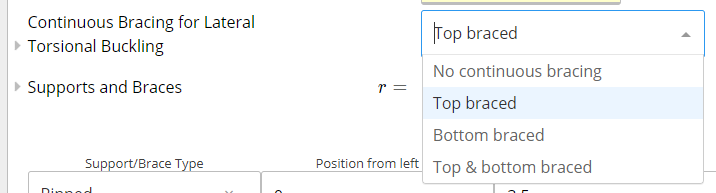
Hip/Valley Beam
Calcs.com has a very similar hip/valley calculator that will allow you to enter plan view measurements and automatically adjust loads and lengths based on roof. To use it, create a beam and select the ‘Hip/Valley’ beam preset. This will let you set a side length and roof pitch and will automatically set a tapered/trapezoidal load on the hip.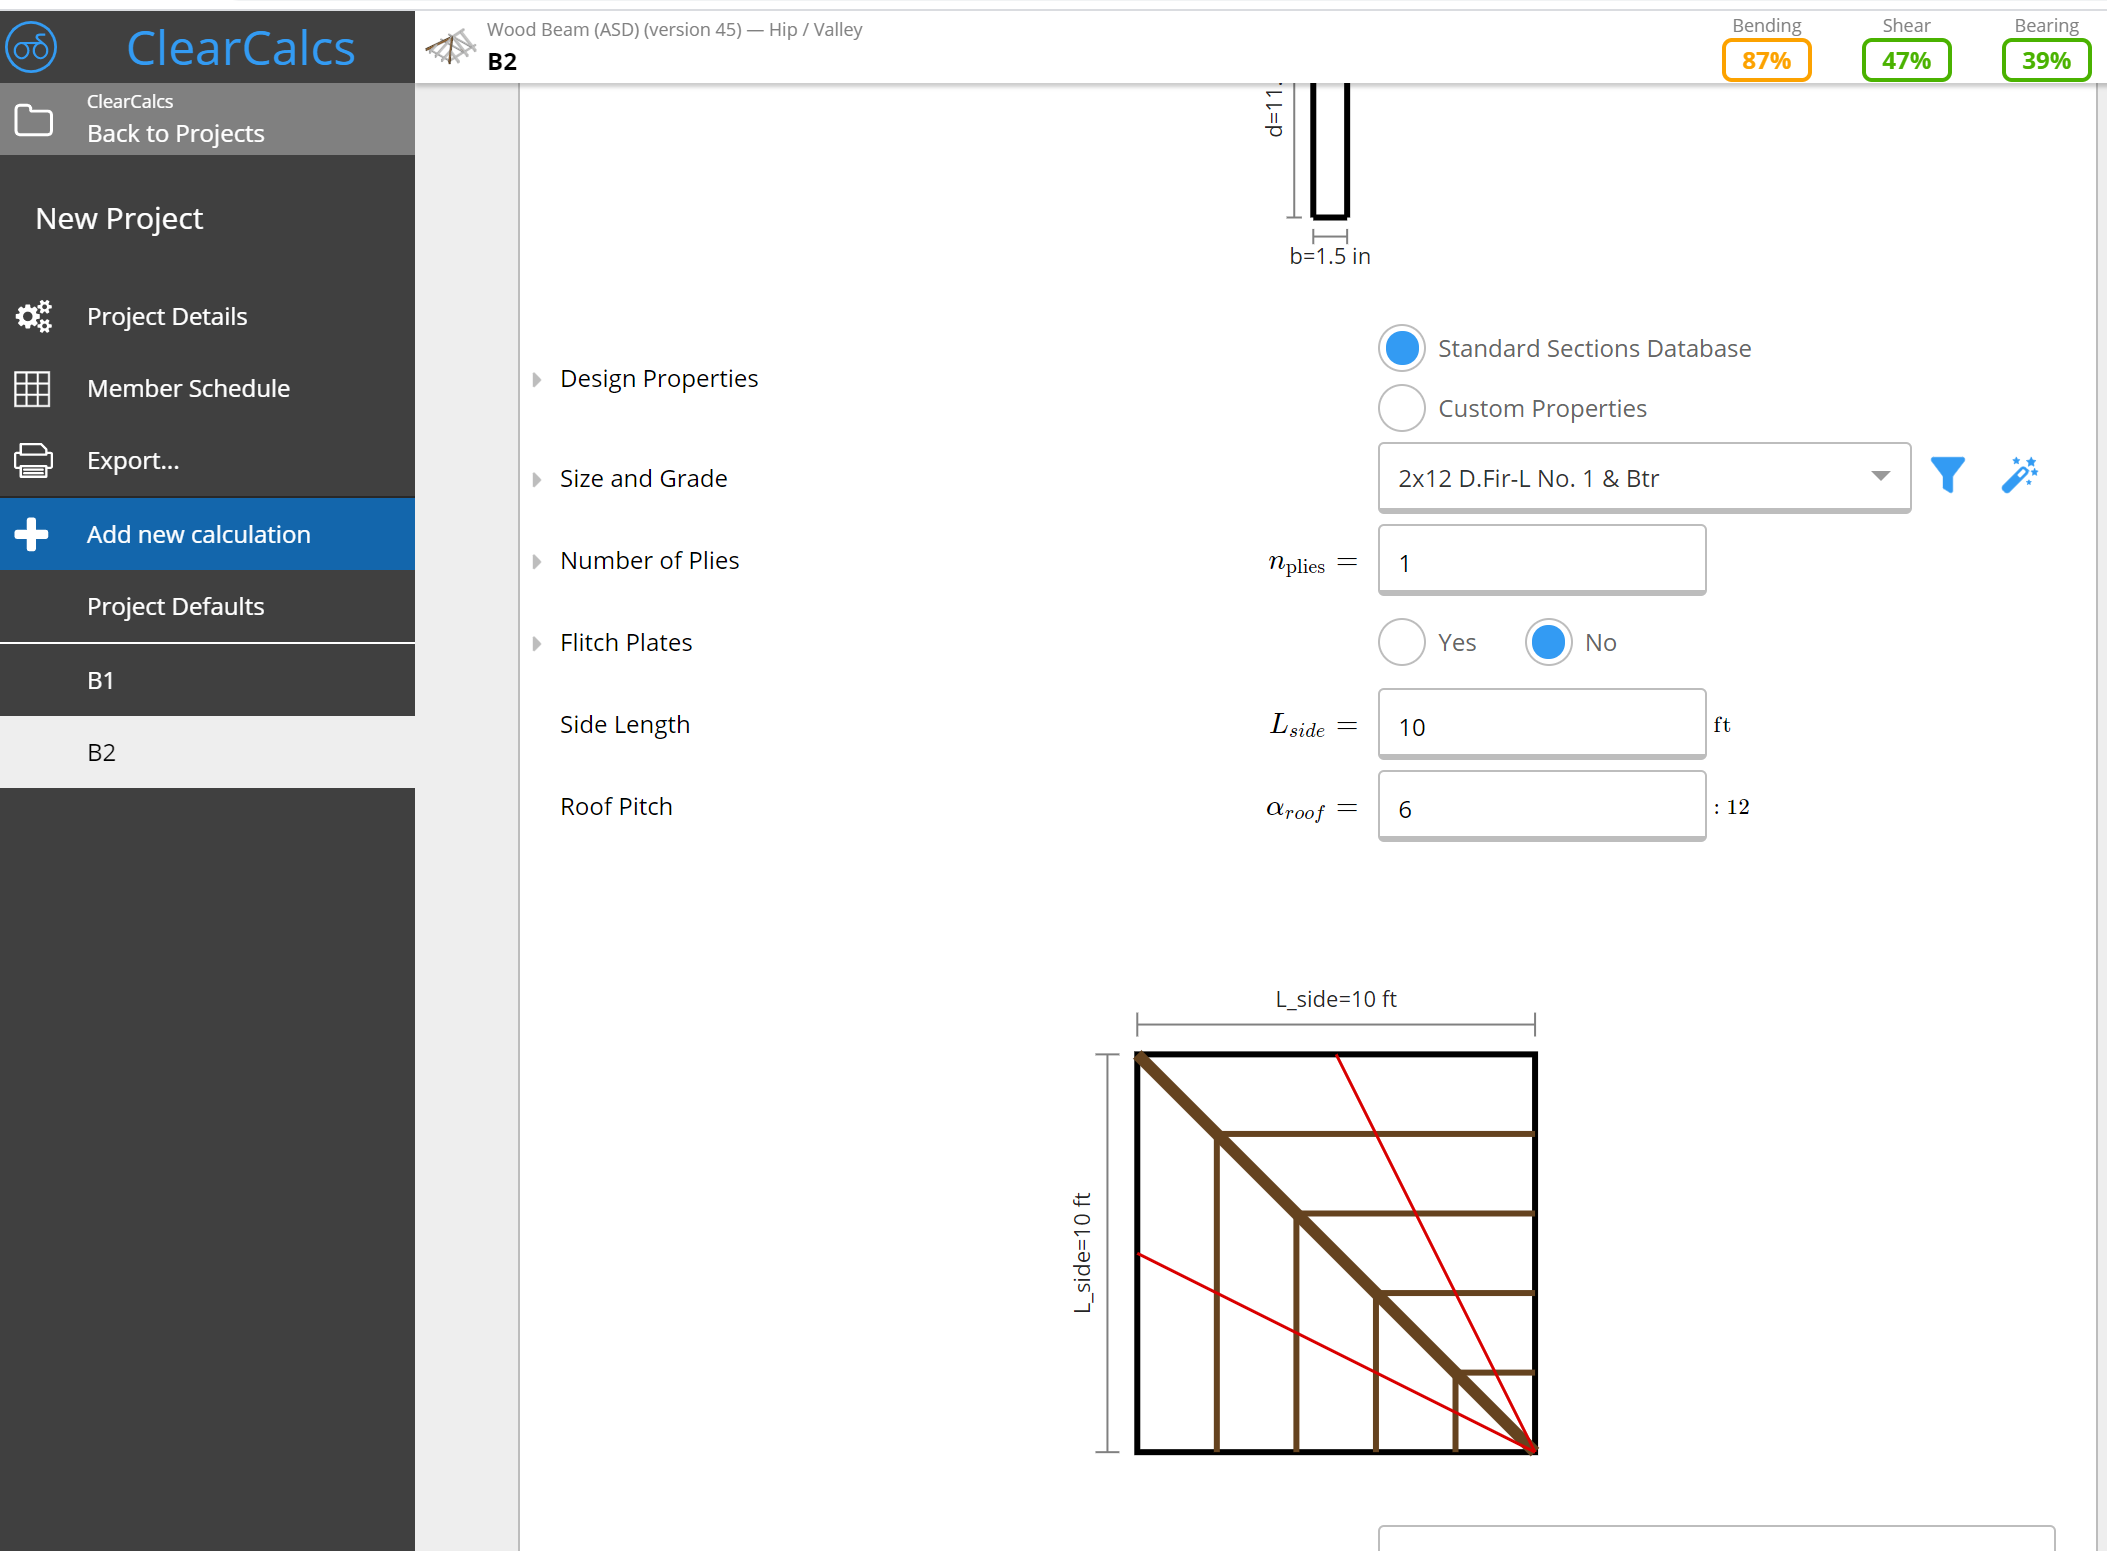
Column
View our full wood column guide including short video and worked examples. Collar Tie Our collar tie module allows you to design either a collar tie, rafter, tie, or collar & rafter tie together. View the full usage and theory guide here. The StruCalc and Calcs.com collar tie modules are quite similar in that you provide a separate rafter length, eave length, and roof pitch, but there are some key differences in the extra capability Calcs.com provides:- You can specify an additional tie instead of just one
- Rafter member and tie members can be designed in separate dimensions/timber types like in StruCalc
- Load entry is along the top of the rafter, and lets you apply both distributed loads and point loads. StruCalc defaulted to 24in O.C. spacing whereas Calcs.com defaults to 16in O.C. spacing (1.33ft).
- Load entry is similar to our beam load entry but because the rafters are sloped, also includes an option for ‘orientation’ with either a Gravity or Aligned option depending on whether the load is acting straight up and down in line with gravity (like roof load) or perpendicular to the beam like wind.
Shear Wall
Calcs.com does not currently have a dedicated Shear Wall module (but we’re adding more calcs all the time!). Want to see it sooner? Let us know! We prioritise based on feedback.Additional/New Calculations in Calcs.com
Calcs.com has several additional calculations not available in StruCalc including Wind Components and Cladding, Steel Member Design (bring your analysis results in from another program), Concrete Beams and Columns, Custom Cross Section Designer, Cold-Formed Steel Beams and Columns, and Portal Frame Analysis. We’re adding more all the time - let us know what you want to see!Features
Adding and managing new calculations and projects
Choose a calculation
StruCalc: Select the icon for the calculation you want at the bottom of the screen Calcs.com: Once you’re in a project, you click the blue ‘Add New Calculation’ button in the sidebar and select the new calculation you’d like to add.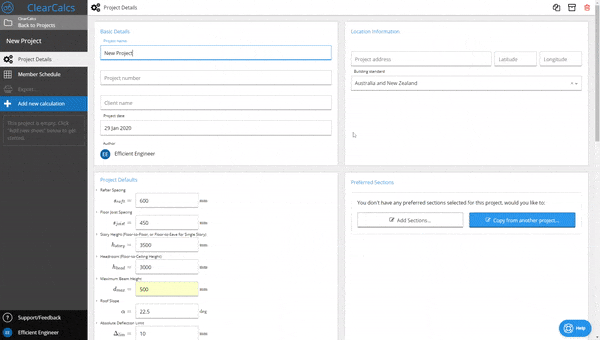
Choosing a material to design in
StruCalc: Select the icon for the calculation you want at the bottom of the screen Calcs.com: Once you’re in a project, you click the blue ‘Add New Calculation’ button in the sidebar and select the new calculation you’d like to add.Choosing specific beam types
StruCalc: Separate icons along the bottom for rafter, floor joist, hip/valley beam Calcs.com: Select the calculator first (ex. Wood Beam) and then select the sub-type from the presets list that opens up (ex. Rafter, Floor Joist). These presets use the same beam calculator, but pre-populate key inputs - for example, a Floor Joist preset will be set as a repeating
Creating a new project
Both Calcs.com and StruCalc have a similar concept of ‘projects’ with calculations housed within. StruCalc: Create new project from File menu, new calculations appear at top of screen and at top of sidebar Calcs.com: Create new project from home screen, new calculations appear in sidebar as they are added.Re-ordering, copying, and deleting calculations
StruCalc: Manage calculations in sidebar and top of page Calcs.com: All calculations appear in sidebar where you can drag and drop to re-order them. Click an individual calculation and you can individually copy, delete, or swap materials on the top right of screen.
Load tracking
Load tracking between beams, columns, and foundations is one of the best features in StruCalc as it allows fast and error free rundown of loads from the top to bottom of a structure. Calcs.com load tracking works in a very similar way! StruCalc: Click the blue hyperlink for “Point Live Load” or “Axial Live Load” to choose a member and reaction to load track from. Load is tracked in the right hand panel. Calcs.com: Click the blue chain ‘link’ icon next to a point load and select the member and reaction you would like to track from. The load is tracked directly in the point load table, and will dynamically update as you make changes to other calculations. If your changes cause a linked sheet to fail, it will show red in the sidebar.
Printing
StruCalc: Click ‘print preview’ in the sidebar to view and print a single calculation, or click the ‘Print’ icon on the bottom bar to print all. Calcs.com: Click ‘Export’ in the project sidebar to print an entire project, or click the ‘Export’ icon on the top right of a selected calculation to print the single calc. Calculations will download as a PDF that you can then physically print if you desire. In the Export dialog, you can choose to select or remove calculations from your print, as well as choose your level of print detail.AutoSize
Both StruCalc and Calcs.com give you the ability to automatically size members to speed up design. StruCalc: Click ‘AutoSize’ in the sidebar, select desired grade, and run Calcs.com: Calcs.com offers expanded options for finding your desired member:- Anywhere you see a “Select…” button below a member selection, click to open a dialog box that will show all available options and how they affect adequacy, filter down or select the option you would like
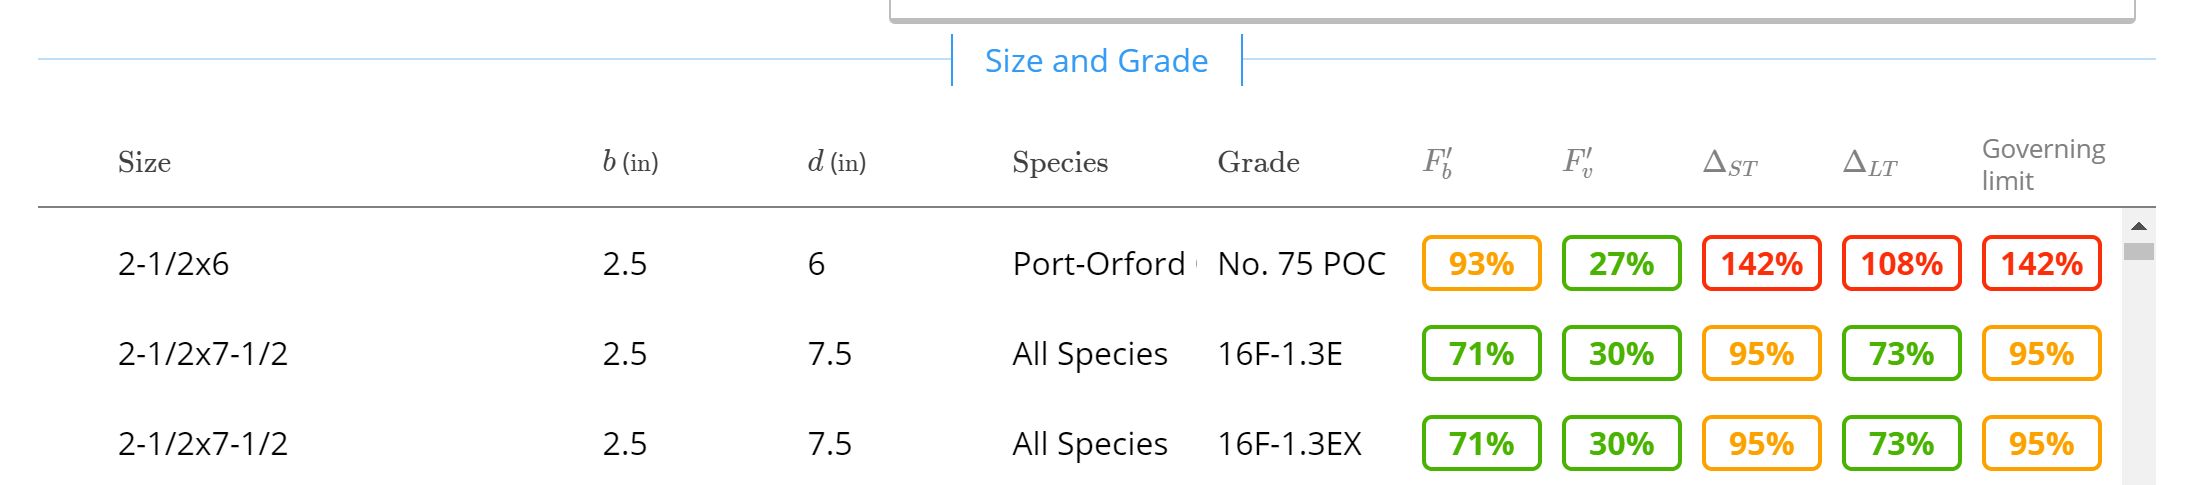
- When setting up a new project, you may specify your ‘preferred’ sections to use on the Project Details screen, or copy from a past project. Once you have specified your preferred sections, anywhere you see an “Autosize” button below a member selection, you can click to automatically select the most optimal section based on your preferences, or you can click the “Select…” button and see your preferred sections starred at the top of the list next to their adequacy.
